EZFolderPin · Practical guides
How to Pin Folders to the Edge of Your Mac Screen
Add three free folder bookmarks with EZFolderPin for Mac. Follow the steps to name, color, arrange and recover your everyday folder shortcuts.
EZFolderPin 1.2.0 · macOS 14 or later
During a typical workday, you may open the same few folders repeatedly: your current project, Downloads, and a collection of design assets.
EZFolderPin lets you turn those folders into colorful bookmarks along the left or right edge of your Mac screen. Click a bookmark to open its folder in Finder.
This guide walks you through adding three folders, giving them recognizable names and colors, and positioning the bookmark rail. Three bookmarks are free forever, so you can follow every step without starting a trial or making a purchase.
Install EZFolderPin and add your first folder
Install EZFolderPin from the Mac App Store, then open it. Follow the first-launch guide to choose a folder you use often.
If you have already completed setup, click Add Folder in the bookmark manager. You can also choose File → Add Folder from the menu bar while EZFolderPin is active.
Find the folder in the macOS folder picker, confirm your selection, and grant access. Once the bookmark appears at the screen edge, click it to check that it opens the right location.
Your folder stays in its original location. EZFolderPin saves a bookmark pointing to it; adding the bookmark does not copy or move your files.
Add two more everyday locations
Repeat the process for two other folders. For example:
| Folder purpose | Display name | Example color | Example mark |
|---|---|---|---|
| Current work | Projects | Blue | Pr |
| Downloaded files | Downloads | Brown | Do |
| Design resources | Design | Purple | De |
Choose folders you already use. They can live in different locations on your Mac.
If you are browsing in Finder, you can also drag a folder onto the screen edge where the bookmark rail sits. Release it when the add-bookmark prompt appears. If macOS then shows a folder picker, confirm that it selects the folder you dragged and complete the access request.
Start with the three locations you open most often. You can change the selection as you learn what works best for your day.
Choose recognizable names, colors, and marks
Open the bookmark manager and select a bookmark on the rack at the left. The inspector beside it shows its display name, mark, color, and folder location.
Give it a name you recognize quickly. For example, a project directory with a long name could appear as “Current Project” on its bookmark. Changing the display name leaves the actual folder name unchanged.
Next, choose an available color and add a short mark. Colors help distinguish different kinds of work, while text marks make individual bookmarks easier to identify.
Changes to the name and mark save automatically. If the app reports a save error, follow the message and retry before continuing.
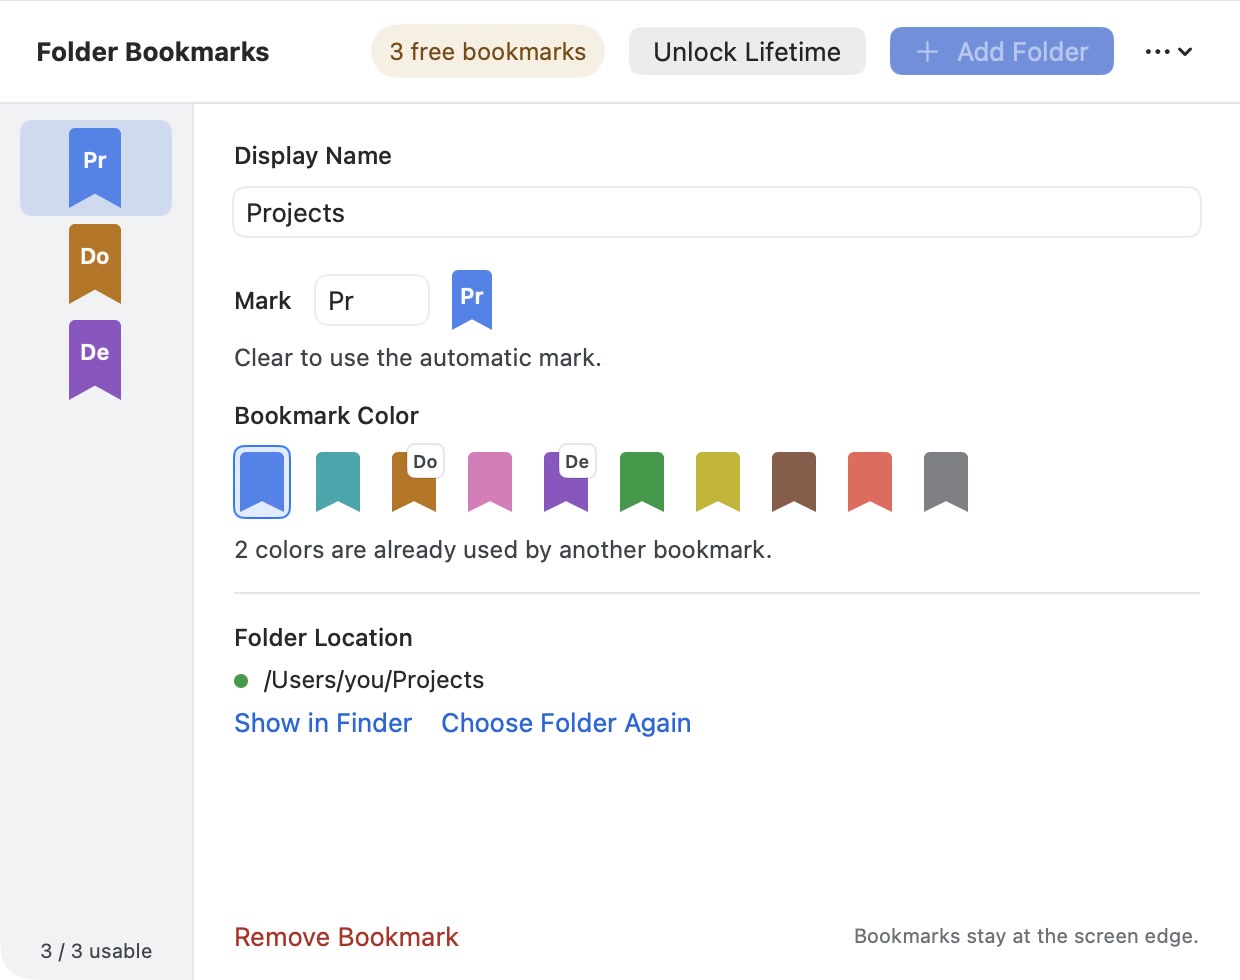
Check the path under Folder Location to confirm that the bookmark points to the right directory. You can also click Show in Finder to check the location.
Position the rail where it feels comfortable
Move the pointer over the bookmark rail to reveal its controls, then adjust it to suit your workspace:
- Choose an edge: Open the grip’s docking menu and select Dock on Left or Dock on Right.
- Move the group: Drag the grip up or down.
- Adjust the width: Drag the width control left or right.
- Reorder bookmarks: Drag them in the manager, placing your most-used folders first.
Try a position around the upper-middle part of the screen, open a few folders, and adjust from there. If your Dock already occupies that edge, try the other side.
For keyboard positioning, make EZFolderPin active and choose File → Adjust Edge Rail, then follow the on-screen guidance. You can also open Quick Guide from Settings for an explanation of the controls.
Close the manager and use your bookmarks
Once the bookmarks are arranged, close the manager window. Keep EZFolderPin running, and the bookmarks will remain at the screen edge.
Click a bookmark to open its folder in Finder. If you forget what a color represents, hover over the bookmark to see its name, full path, and availability.
To have the bookmarks ready after you sign in to your Mac, enable Launch at Login in EZFolderPin Settings. If macOS asks you to approve the login item, follow the prompt in System Settings.
What if something stops working?
An external-drive bookmark says it is offline.
Check that the drive is connected and accessible in Finder. Reconnect or mount it, then try the bookmark again. You can keep the existing bookmark while the drive is temporarily offline.
The folder moved, or EZFolderPin asks for access again.
Follow the recovery prompt to select the folder again. You can also select the bookmark in the manager and click Choose Folder Again in the inspector. If you are changing it to a different folder, check and confirm the replacement. The bookmark’s display name, color, and order are preserved.
Does removing a bookmark delete the folder?
No. Removing a bookmark removes the reference saved by EZFolderPin. The original folder and its files remain in place. If you remove a bookmark by mistake, use Undo immediately to restore it.
What if I need more than three bookmarks?
In EZFolderPin 1.2.0, the first three bookmarks in your saved order are free forever. Reordering changes which three are free. An optional seven-day full trial or a one-time lifetime purchase supports up to ten bookmarks. The trial does not renew or charge you automatically. When it ends, the first three remain usable and extra bookmarks stay saved.
Start with the three folders you reach for most often. Give each a recognizable name and color, position the rail comfortably, and click the matching bookmark whenever you need that folder.
For more help, visit EZFolderPin Support.